Automation with Ansible 101

Introduction:
Ansible is an open source configuration management utility. It can automate and standardize the configuration of remote hosts and virtual machines. We can perform application installation, system update and many such operations.
Why use Ansible:
Ansible is very handy when it comes to installation of software on large numbers of machines. But why ansible when we can use Chef or Puppet.
- Ansible uses YAML scripts which is very easy to understand. (While others use Ruby and a specific DSL)
- Ansible is agent less. It uses SSH which is already present in all the machines. So we dont need to install ansible on all the destination machines. We install it on only one machine which we call Master Node. (Others need agents to be installed on the destination machines)
- Ansible is push based system, meaning whatever we specify on our script on the master node, and run command or execute a playbook, the controller node initiates the execution and pushes the necessary tasks and configurations to the managed nodes over SSH. Each managed node runs the tasks locally based on the received instructions.
Terminologies used in Ansible:
- Playbooks: Playbooks are written in YAML format and define the desired state of a system. It contains of a set of tasks and configurations that Ansible executes on target hosts. Playbooks provide a high-level abstraction and allow you to describe complex automation workflows.
- Inventory: The inventory file in Ansible defines the hosts or managed nodes on which tasks are executed. It can be a static file listing hostnames or IP addresses, or a dynamic inventory script that fetches host information from external sources like cloud providers or databases.
- Modules: Ansible provides a wide range of built-in modules that abstract common system operations such as package installation, file management, service management, user management, and more. Modules are used in playbooks to perform specific tasks on target hosts.
- Tasks: Tasks are the individual steps within a playbook that Ansible executes sequentially. Each task maps to a module and defines the desired state or action to be performed on the target hosts.
- Roles: Roles are a way to organize and encapsulate related tasks, handlers, and files into reusable units. They promote code reuse and allow for a modular approach to configuring systems. Roles can be shared and used across multiple playbooks.
- Inventory Groups: Ansible allows you to organize hosts into groups within the inventory file. Grouping hosts enables you to target specific subsets of hosts and apply different configurations or tasks based on their roles or characteristics.
- Ansible Vault: Ansible Vault provides encryption and decryption capabilities to protect sensitive data such as passwords, API keys, or certificates. It allows you to securely store and use confidential information within your playbooks.
- Ansible Galaxy: Ansible Galaxy is a platform for sharing and discovering Ansible roles and collections created by the community. It provides a vast collection of pre-written roles that can be easily integrated into your playbooks.
Installation:
To use ansible, we need Python. We have two ways to install it on linux.
- Install using system package manager like apt/dnf
- Using pip (the package manager of python)
Here I’m using pip to install ansible.
## first install pip if its not avaialble alreday
sudo apt install python3-pip
pip3 install ansible
Check ansible verison with “ansible — version” command.

In this example, I have 2 machines. Ansible is installed in one machine and I have generated ssh keys, added that to the 2nd machine. I have also set hostnames for easy identification and added them to /etc/hostname.
# on the machine with Ansibel and SSH key generated
sudo hostnamectl set-hostname Ansible_Controller

# the 2nd machine which we will configure applocation
# using ansible from the above machine
sudo hostnamectl set-hostname Ansible_Managed
Create two files called ansible.cfg and hostlist/inventory (or any name). Provide the IP of the server you want to manage or the hostname if you set it in /etc/hosts.
The ansible.cfg is the main configuration that Ansible uses. We can create it inside /etc/ansible, or in our home dir or current working directory. In this example I have created in pwd.
# the inventory/hostlist file

#172.31.32.149
#43.205.125.236
Managed
# the ansible.cfg file
[defaults]
inventory=./hostlist
remote_user=ubuntu
ask_pass=false
[privilege_escalation]
become=true
become_method=sudoNow, lets try to ping the server with the below command: ansible -m ping all. We are getting response from the other machine.

Getting help in Ansible:
Ansible comes with documentation built into the command line. By using this we can get help on how to use different modules and even get few examples.
Use the below command to view list of modules available:
ansible-doc -lTo narrow down the results, we can grep the result to find the particular module (expected as there could be many or could have different name) we are looking for.
for example to look for apt module we can use the command like below:
$ ansible-doc -l | grep apt
ansible.builtin.apt                                                                             ...
ansible.builtin.apt_key                                                                         Add...
ansible.builtin.apt_repository                                                                  Add and re...
check_point.mgmt.cp_mgmt_get_attachment                                                         Retrieves a packet capture or blob data, according to the attri...
community.general.apt_repo                                                                      Manage APT repo...
community.general.apt_rpm                                                                       AP...
community.skydive.skydive_capture                                                               Module which manages flow ...
community.vmware.vmware_guest_network                                                           Manage network adapters of specified virtual machine in given v...
community.windows.win_net_adapter_feature                                                                        Locks package versions i...
Now after we find out the module name we can pass that to get full details of the module:
ansible-doc apt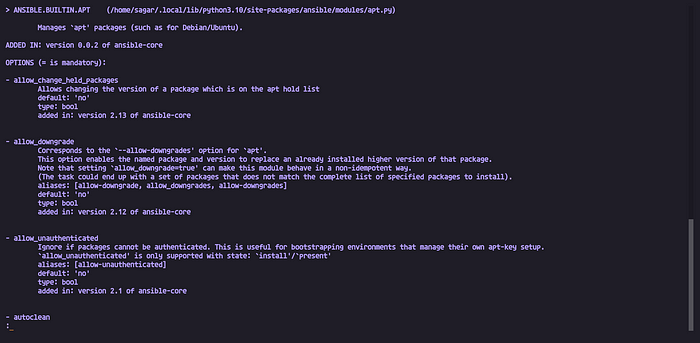
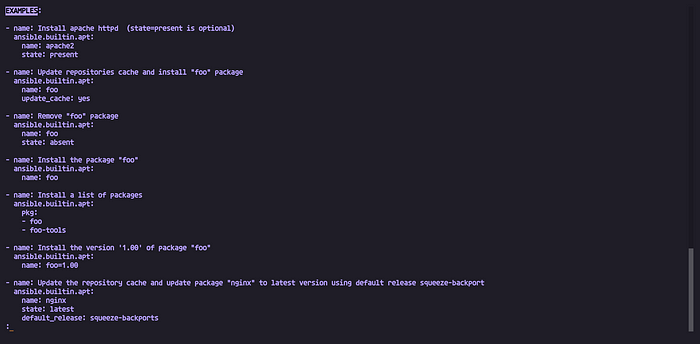
To find example of any module type “/EXAMPLE”.
Using Playbook:
Example: Install Apache HTTP server
Create a yaml file with the task of installing apache http server, start and enable it. Will also send a stiatic html to /var/www/html directory.
---
- hosts: Managed
  become: true
  tasks:
    - apt:
        name:
        - apache2
        state: present

    - service: name=apache2 state=started enabled=yes
    - raw: "echo Welcome to Apache based webapge powered by Ansible | sudo tee /var/www/html/index.html
Now to apply the playbook, we need to use ansible-playbook command as below:

We can see the tasks we defined were executed. Lets check the 2nd machine to see if apache was installed and running.
Note: Check playbook syntax before applying using “ — synytax command”. You can also use -C to check what the playbook is going to do (dry run)
ansible-playbook apache.yaml --syntax

playbook: apache.yaml

----------------------------------

ansible-playbook apache.yaml -C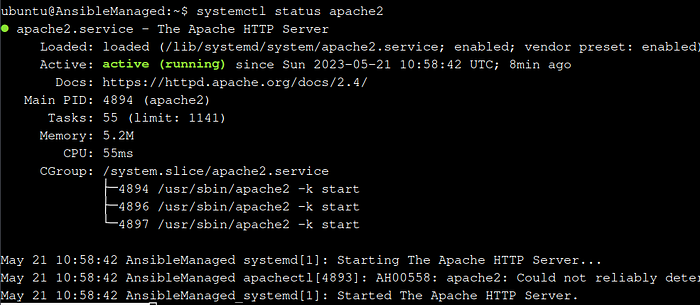
As we can see, Apache has been installed, started and enabled. Lets browse the IP to see our webpage.

Congratulations on completing the basic Ansible setup. This marks the end of this tutorial. We’ll see advanced configuration in future tutorial.
Make sure to terminate any vm instances if you have created to avoid incurring charges.
Thanks for reading.
Reference: Ansible Docs, ChatGPT
